DIY Projects with Olive Wood: Creative Ideas for Your Home
Aug 10, 2024
Creative DIY Projects Using Olive Wood: Emphasizing the Beauty and Durability of the Material
Olive wood is renowned for its unique beauty, rich textures, and incredible durability. Sourced primarily from the Mediterranean region, this wood has been treasured for centuries for its distinctive grain patterns and the warmth it brings to any space. Whether you're an experienced woodworker or a DIY enthusiast looking to embark on a new project, olive wood offers a versatile and rewarding medium for crafting everything from cutting boards to furniture and decorative items. This blog explores a variety of creative DIY projects using olive wood, showcasing how you can transform this beautiful material into functional and artistic pieces for your home.
The Appeal of Olive Wood: Beauty and Durability
Before diving into specific projects, it's worth understanding why olive wood is such a prized material. The unique characteristics of olive wood make it stand out among other types of wood:
- Distinctive Grain Patterns: Olive wood is characterized by its stunning grain patterns, which range from straight lines to intricate swirls and waves. The natural variations in color, from creamy whites to deep browns, create a striking contrast that enhances the visual appeal of any piece.
- Durability and Hardness: Olive wood is incredibly hard and dense, making it highly durable and resistant to wear and tear. This makes it an excellent choice for items that see regular use, such as cutting boards and kitchen utensils.
- Natural Oils and Antimicrobial Properties: The natural oils in olive wood not only contribute to its luster but also give it antimicrobial properties. This makes it a hygienic choice for kitchen tools and surfaces.
- Sustainability: Olive wood is often sourced from pruned branches of olive trees or from trees that are no longer productive in olive oil production. This sustainable approach ensures that no trees are unnecessarily cut down for their wood, making olive wood an eco-friendly material.
With these qualities in mind, let's explore some creative DIY projects that you can undertake using olive wood.
1. DIY Olive Wood Cutting Boards
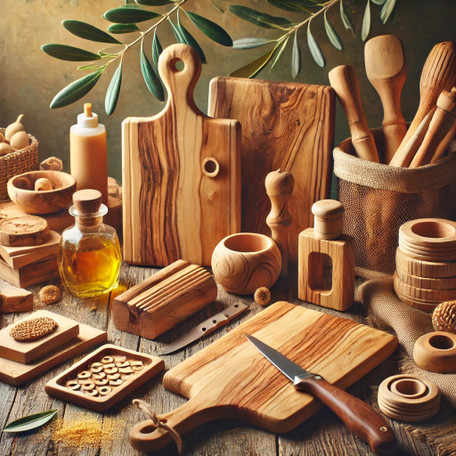
One of the most popular and practical uses of olive wood is making cutting boards. A well-crafted olive wood cutting board is not only a functional kitchen tool but also a beautiful piece of art that can elevate the aesthetics of your kitchen.
Materials Needed:
- Olive wood plank or slab
- Sandpaper (various grits)
- Food-safe mineral oil or beeswax
- Wood glue (if laminating multiple pieces)
- Clamps (if needed)
- Saw (optional, for shaping)
Steps:
- Selecting the Wood: Choose a piece of olive wood that is flat and free of major defects. The size of the plank will depend on the desired dimensions of your cutting board.
- Cutting and Shaping: If necessary, cut the wood to your preferred size using a saw. You can also shape the edges into a smooth curve or any other design you prefer. Some people opt for a natural, live-edge look, preserving the wood's organic shape.
- Sanding: Sand the surface of the wood thoroughly, starting with a coarse grit and gradually moving to finer grits until the surface is smooth to the touch. Sand the edges as well to remove any sharp corners.
- Finishing: Apply a coat of food-safe mineral oil or beeswax to the cutting board. This not only protects the wood but also enhances its natural color and grain patterns. Allow the oil to soak in, and repeat the process until the wood is well-saturated.
- Maintenance: To keep your olive wood cutting board in top condition, regularly apply a fresh coat of oil or beeswax. This will maintain its luster and protect it from drying out.
A handmade olive wood cutting board makes for a perfect gift or a stunning addition to your own kitchen, combining beauty with practicality.
2. DIY Olive Wood Furniture
Olive wood's durability and distinctive appearance make it an excellent choice for creating unique furniture pieces. Whether you're crafting a small side table or a statement coffee table, olive wood can add warmth and character to any room.
Materials Needed:
- Large olive wood slab or planks
- Saw (for cutting to size)
- Sandpaper (various grits)
- Wood glue or dowels (for joining pieces)
- Furniture legs or base (metal or wood)
- Wood finish or varnish
- Clamps (for assembly)
Steps:
- Choosing the Wood: Select a large olive wood slab or planks that match the dimensions of the furniture piece you want to create. For a table, consider a single slab with a natural edge to highlight the wood's beauty.
- Cutting and Shaping: Cut the wood to the desired size and shape using a saw. If you're working with multiple planks, ensure the edges are straight for a seamless join.
- Joining: If your furniture piece requires joining multiple pieces of wood, use wood glue or dowels to secure them together. Apply clamps to hold the pieces in place while the glue dries.
- Sanding: Sand the entire surface, starting with a coarse grit and moving to finer grits. Pay special attention to the edges and corners to ensure a smooth finish.
- Attaching the Base: Depending on your design, you can attach metal or wooden legs to the slab. Ensure that the legs are securely fastened and level to prevent wobbling.
- Finishing: Apply a wood finish or varnish to protect the surface and bring out the rich colors and grain of the olive wood. Multiple coats may be necessary, with light sanding between coats for a smooth finish.
Creating furniture from olive wood allows you to craft one-of-a-kind pieces that are both functional and artistic. The natural beauty of olive wood ensures that each piece is unique, with its own character and story.
3. DIY Olive Wood Decorative Items
For those who enjoy smaller, detailed projects, olive wood is perfect for creating decorative items that add a touch of elegance to your home. From candle holders to picture frames and coasters, the possibilities are endless.
Materials Needed:
- Small olive wood blocks or scraps
- Carving tools or a chisel
- Sandpaper (various grits)
- Wood finish or oil
- Drill (for creating holes, if needed)
- Wood glue (optional)
Project Ideas and Steps:
- Candle Holders: Use a small olive wood block to create a rustic candle holder. Drill a hole in the center of the block that fits a tealight or a pillar candle. Sand the edges smooth and apply a finish to enhance the wood's natural beauty.
- Picture Frames: Craft a picture frame by cutting and joining thin strips of olive wood. Sand the surface smooth and apply a finish. The rich tones of olive wood will beautifully complement any photograph or artwork.
- Coasters: Create coasters by cutting small squares or circles from an olive wood plank. Sand the edges smooth and apply a protective finish. These coasters will not only protect your furniture but also serve as a stylish addition to your living space.
- Ornaments: Olive wood is perfect for carving small decorative ornaments. Whether it's a heart, star, or a small animal figure, the natural patterns in the wood will make each ornament unique. Finish with a coat of oil to bring out the colors.
These small projects are ideal for using up leftover olive wood from larger projects and make great gifts or personal keepsakes.
4. DIY Olive Wood Kitchen Utensils
Olive wood's durability and natural oils make it an excellent material for kitchen utensils such as spoons, spatulas, and serving boards. These handmade utensils are not only functional but also add a rustic charm to your kitchen.
Materials Needed:
- Olive wood blanks or scraps
- Carving tools or a knife
- Sandpaper (various grits)
- Food-safe oil or beeswax
- Saw (optional, for rough shaping)
Steps:
- Selecting the Wood: Choose olive wood blanks that are the appropriate size for the utensils you want to create. The wood should be free of major cracks or defects.
- Shaping: Use a saw to rough out the basic shape of the utensil. Then, use carving tools or a knife to refine the shape and add details. Take your time with this step to ensure the utensil is comfortable to hold and use.
- Sanding: Sand the utensil thoroughly, starting with a coarse grit and moving to finer grits. Smooth out any rough edges and ensure the surface is safe for use with food.
- Finishing: Apply a coat of food-safe oil or beeswax to protect the wood and bring out its natural color. Reapply the finish periodically to maintain the wood's luster and durability.
Handcrafted olive wood utensils are a joy to use in the kitchen and make wonderful gifts for anyone who appreciates the art of cooking.
Conclusion: Embracing the Art of Olive Wood Crafting
Crafting with olive wood is not just about creating functional items; it's about embracing the beauty and history of a material that has been cherished for centuries. The rich colors, intricate grain patterns, and durability of olive wood make it a favorite among woodworkers and DIY enthusiasts alike.
Whether you're making a cutting board, a piece of furniture, or a small decorative item, working with olive wood allows you to create something truly unique and personal. Each piece of olive wood tells a story, and through your craftsmanship, you add to that story, creating heirlooms that can be passed down through generations.
As you embark on your olive wood projects, take the time to appreciate the natural beauty of the wood and the care that goes into each creation. The result will not only be a beautiful and functional item but also a testament to the enduring appeal of this remarkable material.


